

Few plants can match the tropical appeal and spectacular presence of Canna Lilies. Growing from three to over six feet in a single season, these trouble-free beauties originated in South America and the West Indies and have become a favourite here in North America.
Starting Your Bulbs in Pots Indoors:
March is an excellent month to start your Canna Lily bulbs indoors. Follow these simple steps and you should be blooming by June.
1. Bring your bulbs out of winter storage and examine them to find the eyes (newly formed buds developing on the bulb). Each rhizome should have 2 to 3 healthy eyes.
2. Soak the bulbs for several hours in a container of water that has been enriched with a plant starting solution or liquid seaweed. (Mix the solution to the manufactures specifications).
3. Thoroughly wash your plant containers and soak in a mild solution of bleach and water. This will help to guard against disease.
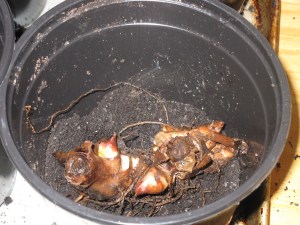
4. Place a few inches of potting soil at the bottom of your container. (I like to use 6″ containers with aprox. 2″ of soil in the bottom).
5. Next place your bulb in the pot with the eyes facing up.
6. Cover with potting soil leaving a 1′ space at the top for watering.
7. Finally water the pot with the left over plant starting solution.
8. Keep soil moist but not wet; in a sunny warm location.
9. Plant outdoors when the danger of frost is past. (Usually mid-May in Southern Ontario.)
Tip: Canna Lilies grow very well in containers . To grow your Cannas in containers all season long you will need to transfer them to a larger and heavier container. Place them in a sunny location and keep them well watered.


Planting Bulbs Directly Out Doors:
If you do not have the space or the desire to pot up your bulbs indoors you most certainly can start them directly outdoors. Plant once all danger of frost is past.
1. Choose a full sun location to plant your bulbs.
2. Prepare your soil making sure to add plenty of organic matter.
3. Soak your bulbs for several hours in a plant starting solution.
4. Plant your bulbs (rhizomes) approximately 4″ to 6″ deep with the eyes facing up, spacing them 15″-18″ apart for tall varieties or 10″-12″ apart for the medium to dwarf types.
5. Keep moist but not wet. You can begin to increase watering once the actual plant emerges.
End of The Season Care and Storage
After blooming has finished for the season leave the foliage in place; don’t cut it off. The leaves will gather sunlight and provide nourishment for next year’s show. Water as needed. If you live in a warm climate you can leave your bulbs in the ground, removing leaves once they have yellowed. In colder areas (zone 6 or less) lift your rhizomes for winter storage. Store in a paper bag or box in a cool location (like a cold storage room).
Photo Credits: all photos by the author.
All Rights Reserved

I have been given 10 black seeds which I am told are INDIAN SHOT seeds, if I plant/sow the seeds at the front of my house in the Newcastle area NSW they would sun nearly all day and I could move the pot closer to the house in the mid summer heat. My question doing the above action is it the best I could do???
LikeLike